If you’re maintaining a dataset that frequently has to be updated in a predictable and consistent manner, automating that process has obvious benefits. It might cost some time to set up the code to automate the work, but you’ll likely save time in the long run. And, if you’re like me, writing the code will be less mind-numbing than repeatedly updating the same spreadsheet over and over again!

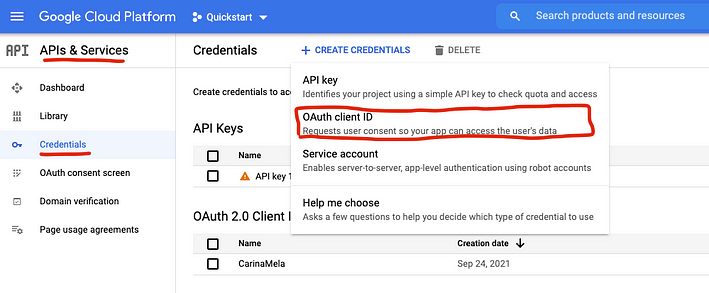
Screenshot of Google Cloud Console edited by the author.

taken after successfully running the quickstart script.


.

Screenshot by the author.
Google spreadsheets provide excellent functionality for maintaining basic datasets. Some of the obvious advantages are that they are free, easy to access, and easy to share. Moreover, Google spreadsheets can be especially powerful because of their ability to connect with tools like Zapier or Phantombuster that can create automated workflows between a plethora of different online applications.
Although these kinds of tools usually offer functionalities to automatically manipulate Google spreadsheets as well, I’ve experienced a lack of flexibility on how to update your spreadsheets. A customized Python script can offer way more flexibility and possibilities.
To update your Google spreadsheets with Python, you can use the Google sheets API. Google offers free API access to several of their workspace apps, like Gmail, Google Calendar, Google Drive, and Google Sheets. You can check out their API library here.
Below I’ll walk you through the steps to set up the Google Sheets API with Python and show a couple of basic examples of how to manipulate spreadsheets using the API.
Setting Up the API
Step 1: Create a Google Cloud Platform project
To get started with any of the Google workspace APIs, you need to have a so-called Google Cloud Platform (GCP) project. A GCP project forms the basis for all of Google’s cloud computing services, including their API library. Setting up a project and using the APIs is completely free. Follow the steps outlined here to create your GCP project. It should be pretty straightforward.
Step 2: Create Credentials
After creating a GCP project (step 1), we need to set up our credentials for accessing the API. Our credentials are like a key for the API to know who is requesting access to its data and services. You can follow the steps listed here to create desktop application credentials. In my experience, some steps were missing in this tutorial, so I’m giving the detailed version below.
- Start by navigating back to your Google Cloud Console.
- Find the APIs & Services tab, and then select the Credentials page
- Click on *+Create Credentials *and select OAuth client ID.
- Select Desktop app as the application type and give your app a name. Then click create.
- You will be prompted to set up your OAuth consent screen. Follow the steps you are prompted with and make sure to add yourself as a test user.
- After generating your client ID, you will be able to see it on your credentials page.
- Click the download button to download a JSON file with your credentials. Rename it to credentials.json. You will need this in the next step.
Step 3: Set up the API
After creating a GCP project and generating your credentials, it is time to connect to the API with Python for the first time. You can follow the steps outlined here. The steps given on the Google developers page are pretty self-explanatory. Three things I want to add:
- Make sure to have a look at the prerequisites before diving in.
- Don’t forget to move your credentials.json file to the same folder where your quickstart.py file is.
- Change the URL in the SCOPE list in the quickstart script to https://www.googleapis.com/auth/spreadsheets to make sure that you have both read and write access.
If everything goes as expected, you should see this in your browser after running the sample script:
After successfully running the sample, you will also find a token.json file in your workspace. This file is used for authentication on any of your future calls to the API. You’re now ready to use the API!
Using the API
Now that we have set up the API connection, we can use the API to create, read, and edit Google spreadsheets! Extensive documentation on how to use the API can be found here. I’ll run through a few basic examples below.
Reading from an existing spreadsheet
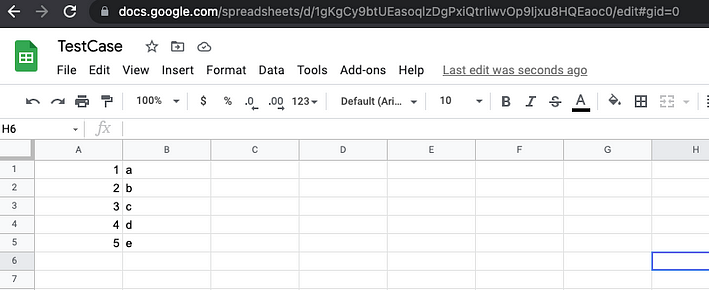
Reading from an existing spreadsheet is a key functionality if you want to automate your spreadsheets. Let’s create a new spreadsheet in the Google workspace and input some data. Below is a screenshot of the table I created.
The API identifies spreadsheets using a spreadsheet ID. To connect to a spreadsheet that already exists, you can find the spreadsheet ID in the Google Sheets URL as follows:
After identifying the spreadsheet ID of the spreadsheet we just created, we can use the API to connect to the spreadsheet and to read its data. Below is a code example of how to do this. The main functionalities to retrieve data from an existing spreadsheet are provided by sheet.values().get().execute()* on line 17. *Note that this is where we pass the spreadsheet ID and the range of values in the sheet we want to retrieve. All code before that establishes the connection to the API and is very similar to the quickstart.py file we used to connect to the API for the first time.
The code returns a list of lists containing the data of our spreadsheet. Note that the data is returned row-by-row this way.
Writing to an existing spreadsheet
Next, let’s try to add a new value to the spreadsheet. After all, this is the second key bit we need to automatically update our spreadsheets.
The code below shows how to add a row to the existing data with the values [6, f]. Similar to reading values from an existing sheet, we need to start with establishing the connection to the API and identifying the spreadsheet ID. Because we are now writing new data to the spreadsheet, it is essential to make sure that you have not specified read-only permission in your SCOPES list (line 5).
The main functionalities to append new data to an existing spreadsheet are provided by *sheet.values().append().execute() on lines 17–22. *Note that this is where we pass the spreadsheet ID, spreadsheet range, and several other parameters that specify how the data has to be inserted and what data has to be inserted. The body parameter takes a dictionary with values to append to the existing data table, using the same list-of-list format we saw before.
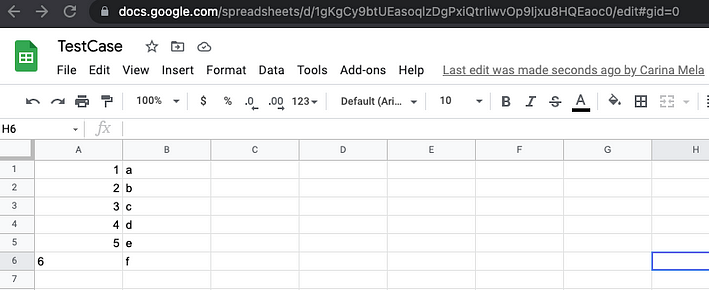
After running the code, the spreadsheet is automatically updated with our new entry. The new row is neatly appended to the data that we manually wrote in the spreadsheet.
Final Thoughts
The Google workspace API library is a really powerful and relatively user-friendly way to automate workflows related to any of the Google workspace applications. In this tutorial, I walked you through setting up the Google Sheets API with Python and showed a few examples of how to manipulate spreadsheets using this API. The possibilities of how to use this are endless.
Setting up access to the other APIs involves a very similar process and would allow for even more elaborate and complex automation flows.
